|
|
|
Users Of The New UltraSeps v3 (Version 3)
Disregard all reference to unlocking UltraSeps and any issue that pertains to it.
Also disregard all reference to QuickLicense as this has been removed from Version 3.
UltraSeps v3 users should never install Version 2 to resolve any type of issue or if a new version of Photoshop is installed. Only use the installers and files included with your UltraSeps Version 3 (v3) original purchase download!
|
|
Most Often Asked Questions
|
|
UltraSeps Version 2 Will Not Run On MacOS Catalina, Big Sur or higher.
UltraSeps Version 3 Must Be Used!
|
|
Register Marks Actions Not Working In CC 2020 or higher?. Click HERE!
|
|
Separations Look Wrong With Solid & Inverted Channels?. Click HERE!
|
|
Channels other than the whites and black of Index Separation contain nothing?. Click HERE!
|
|
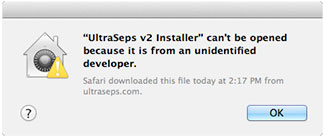
Unidentified Developer Warning When Trying To Install On Macintosh?. Click HERE!
|
|
UltraSeps is not working on Macintosh OS Catalina, Big Sur or higher?. Click HERE!
|
|
I'm getting these 8800 Errors telling me something is not available?. Click HERE!
|
|
Using Photoshop CC 2015? Problems? This Version Is Buggy. Click HERE!
|
|
Downloading The Latest Photoshop? How To Keep Your Previous Versions! Click HERE!
|
|
When I turn on the RGB Channels, everything looks washed out?. Click HERE!
|
|
Color Book Error - Sim#1 - 5 Color Sim - Photoshop CC v24 and higher?. Click HERE!
|
|
|
|
Technical Support Help UltraSeps v2
Answers to just about every common support question regarding UltraSeps v2.
All support issues including the contents from the User Guide are available on this page.
Questions regarding issues not covered, that require clarification or if any confusion persists with
getting UltraSeps up and running correctly, please contact our support email
Please note: I reply to email between the hours of 10:00 AM – 6:00 PM, Monday – Friday and also check email at approx. 10:00 AM on both Saturday and Sunday. Based on New York City, USA Eastern time zone. This is not an absolute guarantee however as events beyond my control could delay my response.
|
|
|
|
|
|
Solid Filled - Inverted Channels - Separations That Look Completely Wrong!
This can happen after using one of the Custom Color Channel Actions of UltraSeps to generate a specific color channel(s) for a separation, followed by running a new automated color separation such as Simulated #3, or whatever on another file.
After doing so, its now possible that one or all of the channels are filled as a solid or appear inverted. This "might" also happen after running Index Separations followed by running a new automated separation on another file.
REASON WHY THIS HAPPENS AND HOW TO EASILY FIX:
This occurs due to an Invert function of Photoshop not responding properly in modern Photoshop versions. The Custom Color Channel Action, which makes use of Color Range instructs the end user to select Invert. If then one of our Actions makes use of Color Range for only a single purpose, this can impact the entire separation resulting in solid or inverted channels. Although our scripts do contain a command to reset Color Range to its default, newer versions of Photoshop (Creative Cloud) do not respond to it.
Simply restart Photoshop and the issue will be resolved.
Restarting Photoshop will reset the Invert function to its default value.
Another way to resolve this is to make a new channel using Color Range and to make sure to uncheck Invert prior to clicking OK. Any type of channel can be made with any type of selection. The primary goal is to uncheck that Invert check box.
An illustration of the issue along with a screenshot of how to reset the Color Range Invert Box can be seen here
If none of the above works, the Preferences File of Photoshop is damaged.
Click here for instructions on how to reset the Preferences.
|
|
I'm trying to run the Register Marks Actions in Photoshop CC 2020 (and likely future versions as well) and am getting a error stating the "Shape" is not available?
Cause: CC 2020 (and likely versions yet to come) sometimes does not load all the custom shapes.
How To Fix:
In PS 2020 from the menu bar select Window > Shapes
This opens up the Shapes panel.
Scroll down and expand the folder named Legacy Shapes and More.
Now expand the folder named Legacy Default Shapes.
This will make that shapes folder active. It contains the custom register mark shape.
The error will no longer be generated and the register marks will function.
|
|
Most of the channels other than the whites and black of my Index Separation contain nothing?
If restarting Photoshop does not resolve this issue, read the below solution...
This is due to Adobe constantly changing the behavior of the Color Range function of Photoshop for some unknown reason. As of 3/5/2019 we have updated the Actions set of UltraSeps v2 and v3 to work correctly with any version of Photoshop when running Index Separations and have updated the full downloads.
If however you already have UltraSeps installed, all that's needed is to download a new set of Actions followed by loading the new set into the Actions Panel of Photoshop. The old set of Actions can be deleted from the Actions Panel.
Download an updated set of Actions for UltraSeps v2 below if needed.
Version 3 Users: Contact us for a download link if your copy was purchased prior to 3/5/2019.
Do NOT use the Actions below!
WINDOWS: Download The Version 2 Actions Update Here
MACINTOSH: Download The Version 2 Actions Update Here
|
|
I'm trying to install UltraSeps v2 on Macintosh OS Catalina, Big Sur (or higher) and it doesn't work?
UltraSeps v3 (Version 3) must be used with these newer versions of Mac OS!
Version 2 or the trial is not compatible with newer releases of Mac OS.
If using Catalina, Big Sur or higher and wanting to TRY UltraSeps prior to buying, either install to an older Macintosh OS or download the Windows trial and install to any Windows system. UltraSeps works identically on Mac and Windows so if liking it on Windows, the experience will be the same using a Mac with UltraSeps v3.
The reason for the above is NOT due to UltraSeps, its due to the software which protects the trial. Apple is habitually changing their OS (drastically) and imposing highly restrictive and cumbersome security. Due to this, I'd rather just not deal with a trial version on Mac.
|
|
Issue: I just downloaded Photoshop CC v24 (or higher) and am getting a Color Book Error when running Simulated #1 or the Basic 5 Color Sim Process?
Cause: This is due to Photoshop CC v24 and likely versions going forward no longer supporting Pantone Color Books UNLESS you pay $15 monthly to Pantone to license using Pantone Colors in Photoshop!
Yes, its crazy but true. The greed is running wild!
Although UltraSeps doesn’t use Pantone Color Books, we did find a few calls within these 2 functions that make use of them.
Solution: Simply copy an updated Sim#1 JavaScript to your copy of UltraSeps.
Windows: Download a new copy of the Sim#1 JavaScript here
Unzip the downloaded file
Open your C: Drive and look for a folder named QSU
Copy the new Sim#1 JavaScript to the QSU Folder (Agree to overwrite the file)
The issue is now resolved
Macintosh: Download a new copy of the Mac Sim#1 JavaScript here
Unzip the downloaded file
Open the Applications Folder – Open the UltraSeps Folder – Open the QSU Folder
Copy the new Sim#1 JavaScript to the QSU Folder (Agree to overwrite the file)
The issue is now resolved
(The Macintosh fix is only for the full purchased version of UltraSeps v3)
|
|
I'm using Photoshop CC 2015 and when running Simulated #2, Simulated #3 or some other separations the white underbase and highlight whites don't appear correctly.
This is a bug affecting Photoshop CC 2015 as the foreground and background colors get confused when running the separation due to an issue with how Photoshop CC 2015 creates the Preferences file.
Click here for a simple fix and example.
|
|
I'm using Photoshop CC 2015, and I'm always getting the following error:
"The command Move is not currently available".
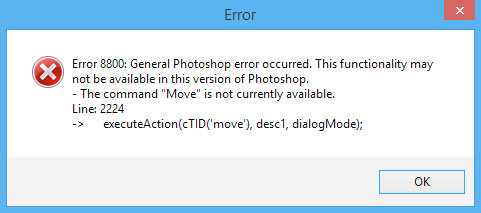
This is a bug with Photoshop CC 2015 and is easily fixed.
All that needed to do is undock the Channels Panel from any other Panel.
Make sure the Channels Panel is floating all by itself in Photoshop and the error will no longer be generated.
The Channels Panel can be docked with other Panels HOWEVER needs to be the top visible Panel in the group.
Click here for a visual example of how the Channels Panel needs to be setup prior to running separations.
|
|
I've just downloaded the Mac version and my Mac says the installer can't be opened?
And-Or I get a QuickLicenseRT can't be opened message when trying to run UltraSeps?
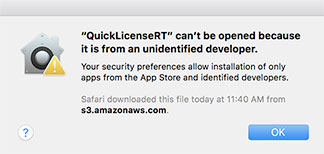
This is due to newer versions of OS X "protecting you" from any software the Apple Store isn't aware of or other software that hasn't been verified by Apple. To some degree, this is ridiculous.
Run Installer If Blocked: To resolve this, just hold down the Control Key then click the UltraSeps installer (don't double click) and choose Open. The installer will now run. You can also right-click the installer and choose Open.
Run QuickLicense If Blocked: Go to the Apple Menu then open System Preferences and click "Security & Privacy". The blocked application, in this case QuickLicense will be listed there. Click the "Open Anyway" option. This will authorize QuickLicense to always run when needed.
Note: The trial does not run on MacOS Catalina, Big Sur or higher.
The full purchased copy of UltraSeps v3 does run on these newer Mac OS however!
The reason is NOT due to UltraSeps, its due to the software which protects the trial. Apple is habitually changing their OS (drastically) and imposing highly restrictive and cumbersome security. Due to this, I'd rather just not deal with a trial version on newer Mac OS releases.
|
|
When I turn the RGB Channels on, the color separation and everything looks washed out?
With the release of CS4 and possibly all versions of Photoshop going forward, CS5 - CS6 and Creative Cloud, Adobe has changed the manner in which channels appear if the composite RGB channels are also turned on.
One way to view the separation correctly is to simply turn off the RGB channels. Another permanent way is to make the changes below to the Preferences of Photoshop and restart Photoshop after the changes have been made.
Its important to note that some users, for unknown reasons may never encounter this display anomaly.
Also important to note is that the RGB channels, no matter how the separation appears with them on or off has no bearing whatsoever on film output or the color separation channels themselves.
If however wanting to assure yourself of the accuracy and appearance of the color separation itself, just turn off the RGB channels to view and when making adjustments.
CS5 - CS6 - Creative Cloud Fix:
Launch Photoshop
Select Edit>Preferences on Windows. On Mac select Photoshop in the left corner and choose Preferences.
Choose Performance.
Look for the Graphics Processor area and click on Advanced.
In the drop down menu change the setting to Basic.
Deselect Use Open CL.
Click Okay, close the Preferences window and restart Photoshop.
Color Separations will now appear correctly with the RGB Channels visible.
CS4 Fix:
Launch Photoshop
Select Edit>Preferences on Windows. On Mac select Photoshop in the left corner and choose Preferences.
Choose Performance.
Deselect Enable Open GL Drawing.
Click Okay, close the Preferences window and restart Photoshop.
Color Separations will now appear correctly with the RGB Channels visible.
|
|
I have Creative Cloud and would like to download older versions of Photoshop. Is this possible?
Although not really a technical support question, I've been asked this countless times for one reason or another. It's also helpful if experiencing difficulty with the latest version and would like to troubleshoot using a previous version.
Older versions of Photoshop and other Adobe applications down to CS6 are easily downloaded and installed.
Click here for simple instructions.
|
|
I'm trying to Open or Place my color separation into Illustrator for film output and am getting an unsupported color mode error so the file won't open or place?
Your separation doesn't include RGB channels. Either they have been deleted by the end user or you have accessed a function of UltraSeps that needed to remove the RGB Channels such as running the register marks actions following a separation or doing an Index Separation.
Illustrator and other external applications used to print from require composite RGB Channels to read the image. You can create 3 new blank spot channels, move them above all the spot color channels in the separation and then change the mode of the file to RGB. Image > Mode > RGB Color.
Or simply download this Photoshop Action that will automatically add RGB Channels to a color separation which lacks them.
It doesn't matter that the newly added RGB Channels contain no data and are blank. Its only required they exist so Illustrator and other external applications can read them.
If printing separations directly from Photoshop, do not add RGB channels as the option to select "Separations" at output will be unavailable.
Remember, printing Photoshop separations using Illustrator requires a RIP. If a RIP is not available, use the No RIP functions of UltraSeps to convert the separations to halftones within Photoshop and print directly from Photoshop.
I also highly advise to see our comprehensive video on printing separations with Adobe Illustrator.
|
|
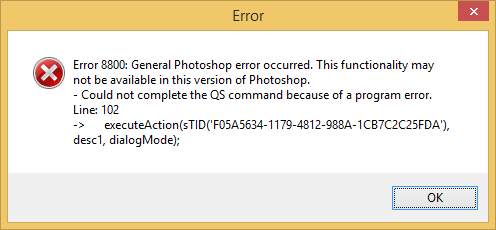
I've just installed UltraSeps and when trying to run a separation or just about anything, I'm receiving 8800 errors similar to the below screenshots?
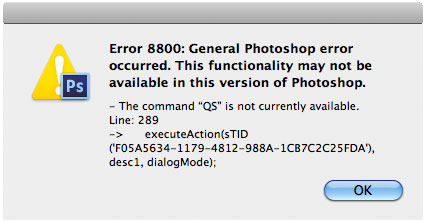
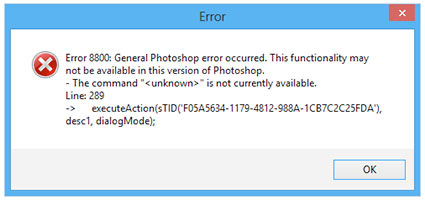
Photoshop needs to be closed when running the installer.
If Photoshop was running during the install, it needs to be restarted.
If the issue persists, close Photoshop and run the installer again.
On Macintosh, the installer will just run.
On Windows it may ask to Modify, Repair or Remove UltraSeps. Click Repair.
|
|
UltraSeps has been running fine, now all of a sudden I'm getting a Runtime Error 216 followed by two other errors:
Cause: Your Photoshop Preferences File is damaged. This is a rare issue although easily fixed.
The error screens in order of appearance are shown below.
There's two ways to reset the Preferences. One involves simply holding down a few keys when starting Photoshop and the other involves physically deleting the Preferences file. The second technique needs to be used if the first does not work although "usually" it does.
How To Reset Photoshop's Preferences By Using Modifier Keys At Launch:
Hold down the three modifier keys Ctrl-Alt-Shift if using Windows
or (Command-Option-Shift with Mac) while starting up Photoshop.
On Windows, these keys need to be held down immediately AFTER double-clicking Photoshop to launch it.
On Mac, they can be held down while selecting Photoshop to launch.
Photoshop will display the following prompt:
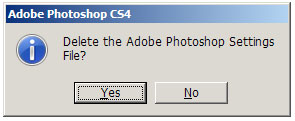
Click “Yes” and Photoshop will delete the preference file.
This brings all settings back to factory default.
Make sure the three keys are already depressed while Photoshop starts.
Hold the keys down long enough during the startup process until you see the prompt.
Finally, make certain Photoshop has retained the UltraSeps Custom Color settings. If not, reload it.
If for some reason this does not work on your Windows system, although it should, see the link below for a video on how to manually delete the preferences file.
See this video: Reset Photoshop's Preferences File Windows By Manually Deleting It
|
|
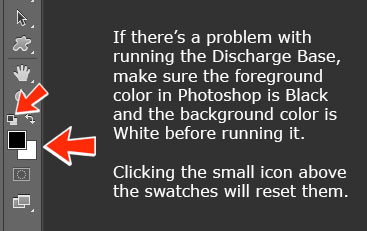
When running the Discharge Underbase Action its adding data to the underbase and not removing it? The best way to describe it is the function seems to be working in reverse?
Although rare, sometimes Photoshop's swatch palette gets confused and does not respond to our script resetting it to a black foreground and white background prior to converting the underbase. If this is happening, make certain the foreground color is set to Black and the background color set to White prior to running the discharge underbase action.
|
|
I'm running the installer for Windows and it doesn't finish. It seems to be frozen?
Its not frozen. If the installer appears to be frozen, look at the task bar at the bottom of your monitor. Most likely there's something flashing. Windows is asking permission to run a script which is part of the installer. Click that flashing box and agree. The installer will now complete. This can happen if not the Administrator on some Windows systems as the flashing bar is sometimes overlooked by the end user.
|
|
I have Photoshop CS3 and the Auto Flesh Actions are generating an error?
The Auto Flesh Actions require CS4 or higher. If using CS3, I do have an Actions set that removes a call to a script which CS3 can't run. If needed, send us an email for a free copy.
This script isn't 100% required and only runs a check on the image format. The Auto Flesh can be ran without it.
|
|
I'm using Photoshop CS6 for my color separations and I can't use or view them with Photoshop CS2 or earlier?
This is a Photoshop CS6 issue and has nothing in common whatsoever with UltraSeps. The fact is, channel separations done using Photoshop CS6 are not backwards compatible with Photoshop versions CS2 or earlier. Adobe has apparently changed the definitions of spot channels and CS2 or earlier can not open them correctly. For an illustrated example of the issue, click here.
|
|
I'm using CS6 on Macintosh and a Finder Window appears in Photoshop when running a separation and remains there afterwards?
This is a minor quirk with CS6 on a very small percentage of Macintosh systems and is nothing to be concerned with. To resolve, when running separations, have all your Finder Windows closed or just choose "Hide Others" within Photoshop. Or just click the Close Button on the Finder Window now visible in Photoshop.
|
|
When running the Custom Register Marks, I get an error the Specified Shape Is Not Available?
Somehow, your copy of Photoshop has not loaded its Custom Shapes File or it has been replaced or deleted by the end-user.
To fix, download the Custom Shapes file here. Its the same one included with Photoshop. Unzip it.
Now in Photoshop go to Edit > Preset Manager > Custom Shapes and load the file downloaded above. The Custom Shapes file can be kept anywhere on your system although don't move it after loading into Photoshop.
If this occurs with Photoshop CC 2020 or higher, scroll to the top of this page and click the link on resolving register marks issues with these later releases of Photoshop CC 2020 and higher.
|
|
|
I can't seem to find the "Screens Button" in Photoshop CS5+ and can't print my separations?
Adobe has removed the halftone output functions from Photoshop CS5 and most likely all versions going forward. Therefore, any separation using halftones must be output from an external application such as Illustrator, CorelDraw or a page layout program. The PDF files below outline the correct procedure.
Please note, color separations from CS5+ will print using earlier versions of Photoshop as they're backwards compatible. Some may prefer this workaround over printing from Illustrator or CorelDraw. The CS5+ issue only pertains to "halftone" separations. Index, hard solid spot color or separations converted to halftones using UltraSeps can be output directly from Photoshop CS5+.
|
|
|
|
|
|
|
Photoshop just crashed when trying to run UltraSeps?
The UltraSeps plugin from a previous trial version or full version has not been removed. Go to your Adobe Photoshop folder, open the Plug-ins folder then open the Automate folder. Delete any UltraSeps Plugin without “v2” in its name. Now restart Photoshop and the trial will function.
Note: If UltraSeps was unlocked on your system previously, the old plugin can still be used.
|
|
I'm receiving 8800 errors. what are these?
An 8800 error can mean just about anything. Its a general JavaScript's error and if reading the error box, it gives a clue as to what the issue is.
Causes for 8800 errors are:
The UltraSeps Plugin is not installed in the Automate Folder of Photoshop.
Multiple Plugins are installed in the Automate Folder of Photoshop.
Clicking an Action not compatible with the current state of your file.
If additional help is needed to resolve an error, take a screen shot of the error screen and email to us along with a description of what you were attempting to do.
Note: Some 8800 errors are normal, such as those generated when the trial expires and during the process of unlocking a new installation.
|
|
When trying to print separations from Photoshop (CS4 or lower) I can't select "Separations" within Color Handling in the print dialog? So when trying to print, everything is printing as a composite image.
You have not deleted the RGB Channels prior to printing. Its vital to delete the RGB Channels before attempting to print your separations from within Photoshop. See Film Output within the User Guide beginning at page 113 for complete information.
|
|
I'm using a Non-English version of Photoshop and its always generating errors?
UltraSeps requires an English version of Photoshop to be installed. We currently have no plans to port UltraSeps into any other language. If a Non-English version of Photoshop is used, UltraSeps will not function.
Click the link below for an easy method to change an installed version of Photoshop to English from another language and then back again if needed.
Non-English Photoshop Version Users Click Here For Information
|
|
I'm using Photoshop CS6 and everything is installed correctly. When running a separation I'm receiving an 8800 Error that includes the following text: "First Document Not Available - Line 70".
You have turned off Open Document As Tabs within Preferences and now all new documents open within a new floating window in Photoshop CS6 and are not tabbed. UltraSeps needs to be run with Document Tabs turned on. An error may be generated if this feature of Photoshop is disabled.
|
|
Getting an error that a Ticket File can’t be found?
The UltraSeps folder the installer has placed on your system (Not the UltraSeps v2 Folder) has been moved or deleted by the end user. If this has occurred, you’ll need to run the installer again. If UltraSeps has been unlocked on this system, you'll be asked when running UltraSeps again if you'd like to restore the current license. Click YES. In some cases however, your computer might need to be authorized again.
|
|
8800 Error saying “The parameters for command Open are not currently valid”?
The UltraSeps folder the installer has placed on your system has been moved or deleted by the end user. If this has occurred, you’ll need to run the installer again.
|
|
The No RIP Functions seem to run very slow? Is there a problem
This feature of UltraSeps is very processor intensive and unlike simplistic halftone methods, they actually employ technology running outside of Photoshop to improve on the dot along while retaining the file as a single, pre-screened multichannel Photoshop document and not generating a separate file for each channel, which is actually quite a trick. This process requires a great deal of computing horsepower.
Total time to complete could be anywhere from 1 - 4 minutes depending on the age and speed of your computer. So, just give it time to complete.
|
|
When opening the User Guide I'm asked for a password?
Its time to update the outdated version of Acrobat Reader installed on your computer. Updating will resolve the password issue as no password is required to view the User Guide. Adobe Acrobat Reader is a free product from Adobe and can be found here: Download Acrobat
|
|
The separations look extremely light and washed out.
The UltraSeps Custom Color Settings File was not loaded into Photoshop to facilitate accurate on screen rendering. UltraSeps compensates for the excessive dot gain screen printers experience and requires the color settings file to be used. See loading the color settings in the User Guide.
If you still think a channel is too light, adjust it with a simple Curve.
|
|
Alert: “Java Script Code Missing”.
The QSU Folder is not located within the C: Drive “Computer/C:” (Windows) or the folder named UltraSeps, which contains the QSU Folder the installer has placed to the root level of the Macintosh HD is not installed. These instances can only occur if it has been moved or deleted by the end user. Never modify or move this folder! If this folder is missing, contact us on how to replace it.
Its also important to have Photoshop installed to the primary internal hard drive. If not and is installed to an external drive, its possible that Photoshop will not locate the scripts due to a path error. On Windows, UltraSeps assumes Photoshop is installed to the internal C: Drive / Program Files. On Macintosh Photoshop needs to be installed to the Macintosh HD / Applications.
Although UltraSeps can function if Photoshop is installed to an external drive, we do NOT provide support to assist getting your system running if Photoshop is installed to another location as too many variables are involved.
Therefore, just make sure Photoshop is installed to the primary internal hard disk BEFORE installing UltraSeps.
|
|
Error: “Could Not Complete The QS Command”.
The UltraSeps Plug-in is not installed. Run the installer with Photoshop closed.
|
|
The action keeps prompting to click OK or doesn’t complete the function.
The action set has been damaged. Since most of the Actions within UltraSeps are not actually Actions, this can still occur if using the Actions within List View and accidentally changing or deleting something. Delete the actions and reload a fresh copy.
|
|
When double-clicking a channel, there’s different “solidity” settings such as 10%, 25%, 85%, etc.
These settings have no affect on the density of the films and even if they’re changed, the film output will not be altered. We use these “solidity” settings to allow separations to render properly on screen to closely match on press characteristics.. Its recommended not to change them.
|
|
When doing a basic Hard Spot Color Separation, my Channels are filled with solid black.
Photoshop is using Masked Areas as opposed to Selected Areas to generate the channel. To fix, go to the Channels Palette and click the downward facing arrow in the upper right corner of the palette and select “New Channel”. When the New Channel window opens, click the “Selected Areas” button and then click OK. Photoshop is now set to use Selected Areas. The new channel created can be discarded.
|
|
One of my Actions Buttons has turned RED and is now unresponsive?
For some reason, you've stopped one of the true Actions of UltraSeps. Simply click one of the blank light red Action Bars to reset. Although most of the Actions included with UltraSeps are not Actions but calls to external programs, some are still Actions including all the"Info" text based Actions.
|
|
When deleting the white area around the art, its still white and no checkerboard pattern can be seen.
You’re attempting to delete the white area on a flattened image. Double-click the background layer to change it to Layer 0. If the image is already formatted correctly, the Transparency Settings in Photoshop need to be changed. Under the Preferences menu choose “Transparency & Gamut”. Next to “Grid Size” select Small, Medium or Large.
|
|
After running a separation, my image is mixed with other images.
Make certain the only file open in Photoshop is the file being processed.
|
|
When auto merging color channels using a Sim #1 separation, I get messages that channels are unavailable.
You have manually deleted channels prior to running the merge action. Run the process again with an intact simulated process separation and no channels previously deleted.
|
|
I have a small press and cannot use flesh inks, flesh tones are too red.
Well, there’s one guaranteed way to print fleshtones, and that’s by using flesh inks. If using flesh inks are not possible, you’ll need to modify the red channel. Use the Dodge Tool to reduce the amount of red ink in flesh areas. Use a more orangey red, print the yellow following the red and increase the amount of highlight white in the flesh. Another option is to run the Simulated #2 Action and using the “Mute Highlight Channel” to tone down the red.
|
|
The shirt color is visible through parts of my white base.
Use another base UltraSeps has engineered for non-blacks or run the Alt White Base - Highlights Action on the file and use that underbase. It also helps to intensify the base using the Curves function and applying data from some of the top colors such as the reds and blues to the base to make the base darker in those areas. This is done by using the Apply Image function of Photoshop.
See this video on using Apply Image.
|
|
I can’t change the color of a channel.
Sure you can! Just double-click a channel then click the small color square to bring up the color picker. From there you can either use the picker to change color or select the “custom” button and type in a pms number.
|
|
Using both the red and orange make the image too dark.
Orange is very close to red and therefore contains much of the same data thus resulting in excess ink. The orange channel is there for certain files that take advantage of it. If it doesn’t work for a particular image, just delete it.
|
|
Index separations look awful on screen.
Zoom in to view them correctly. Also make certain to not up or down sample index files. If an Index separation was run on a 150dpi file at 10”x12”, the final separation must remain 10”x12”! If any dimensional changes are required, you must resize the original and generate a new separation.
|
|
The separations seem to lack color.
This is due to poor quality originals without sufficient color data. Selectively run our image enhancing actions to give the art a little help or improve the art yourself within Photoshop using tools such as Hue-Saturation, Selective Color, Curves, Levels, Vibrance, Sharpening, etc.
|
|
My Separations contain a white base and black channel but all other channels are blank? Or some colors appear inverted or contain a solid fill within other separations such as simulated process.
Or you are getting an error named 216.
If getting solid or blank channels when running Index or any other type of color separation, this usually indicates the Invert function of Color Range needs to be reset. One way to resolve the issue is to just restart Photoshop. Another way is to make a new channel using Color Range and to make sure to uncheck Invert.
If still experiencing issues, Photoshop's Preferences File needs to be reset.
***********************************************************************
Hold down the three modifier keys Ctrl-Alt-Shift if using Windows
or (Command-Option-Shift with Mac) while starting up Photoshop.
On Windows, these keys might need to be held down immediately AFTER double-clicking Photoshop to launch it.
On Mac, they can be held down while selecting Photoshop to launch.
Photoshop will display the following prompt:
Click “Yes” and Photoshop will delete the preference file.
This brings all settings back to factory default.
Make sure the three keys are already depressed while Photoshop starts.
Hold the keys down long enough during the startup process until you see the prompt.
Finally, make certain Photoshop has retained the UltraSeps Custom Color settings. If not, reload it.
***********************************************************************
Additionally, here is the file path to your Photoshop Preferences file if needing to delete it manually. The paths below reference Photoshop CS6, so just substitute your version for CS6.
Please note, the AppData Folder on Windows is usually hidden by default. So you'll need to turn on the system option to view invisible files and folders. If unsure how to show hidden files and folders in Windows see this page.
Windows
Under Windows XP the preference file will be found at:
C:\Documents and Settings\[username]\Application Data\Adobe\PhotoshopCS6\Adobe Photoshop CS6 Settings\Adobe Photoshop CS6 Prefs.psp
Windows Vista, Windows 7, 8 and 10, the preference file will be found at:
C:\Users\[Username]\AppData\Roaming\Adobe\Adobe Photoshop CS6\Adobe Photoshop CS6 Settings\Adobe Photoshop CS6 Prefs.psp
Macintosh
On Macintosh the preference file can be found at:
/Users/[Username]/Library/Preferences/Adobe Photoshop CS6 Settings/Adobe Photoshop CS6 Prefs.psp
Note: Starting with MacOS 10.7 and later, Apple has hidden the Library folder, so you may need to make it visible. Although hidden, the location is the same for all Mac OS versions. To view the Library Folder, hold down the Option Key and select Go from the Menu Bar. Library can now be selected from the Go Menu.
We also have a video on how to manually delete the Photoshop Preferences file on Windows.
Click Here to open the Index - Solid Fill Channel Fix as its own page to bookmark.
|
|
Support Email:

|
|
|